During the summer semester 2020, there was a printer in the Fab Lab that was constantly cancelled for testing. The printer with the name “Hades” had to serve as a test object for a children’s book. But what does a children’s book have to do with highly experimental, plastic-saving techniques? Let’s lunge a litte bit.
Earlier this summer semester, I decided to develop a children’s book for 3D printers. Together with my fellow student C. Ajiboye, this became a manual that tells a story on one side, one of Ursa, a girl exploring 3D printing through “Learning By Doing.” On the other side, there were explanations of how Ursa finds problems and what solutions it gives for each of them.
But the last page was special:

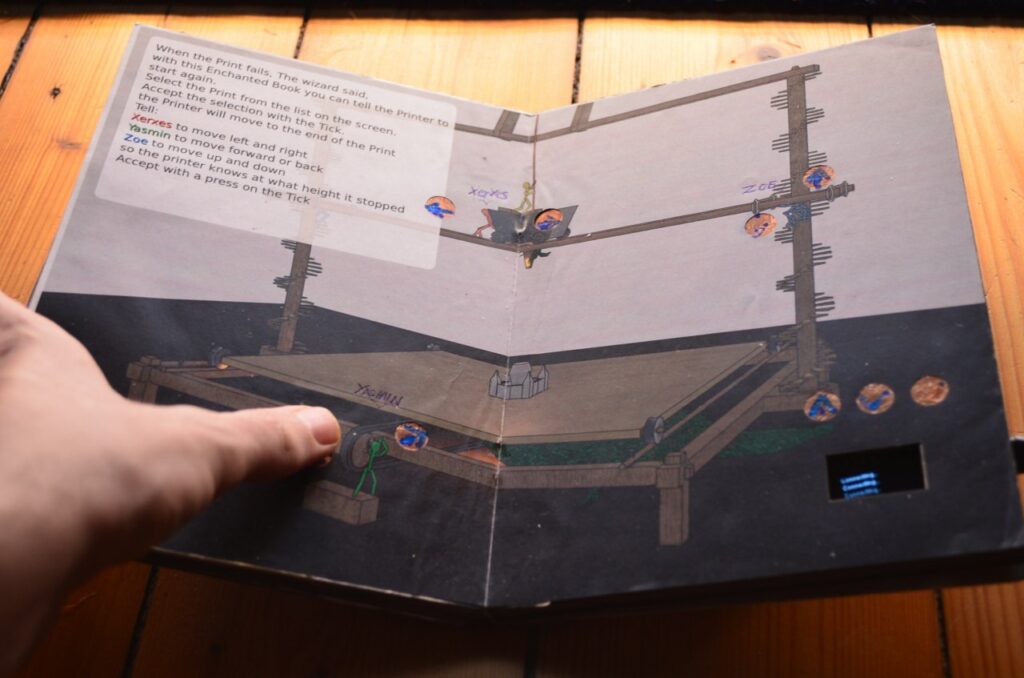
A WLAN-enabled (ESP32) microcontroller was embedded in this page. This one could feel touches via its touchpins. I then soldered these pins to copper surfaces and hid them under the page. One laser cut later, the copper surfaces could be seen shining through.
Thanks to these surfaces it was now possible to give commands to the ESP32. And thanks to the Octoprint servers, it was then possible to give commands to the printers. Yes, you read that right, this little book has a remote control for a 3D printer built in.
But What is the Point of All This?
Restarting a 3D print is not an easy task, so far there is not a single Octoprint plugin that dares to do this. The result is that when a print fails, which the sensors do not notice, a lot of time, sometimes days, and also up to kilos of plastic are lost. This book was intended to prevent that.
A book has many advantages: it’s quickly at hand, it’s often where you want it, and the software doesn’t change much. It is also lighter than a laptop and thus handier to use. What’s more, you don’t have to boot it up or preconfigure it. The interface is simply there.
But How do You Restart a Print With a Book Now?
A 3D print is stored in machine code. This “code” is written line by line and executed line by line afterwards. So a group of lines represents a layer, because a 3D print is done layer by layer. If a 3D print fails at one point, the commands could be executed again from this point. In the file, as well as in the real print, an exact height is defined for this. You could measure this height, but neither with the eye nor with a ruler you can find it exactly. With the 3D printer itself, on the other hand, you can find the exact height. Like calibrating old 3D prints, you can now use a piece of paper and the tip to determine to within 0.1mm where a print failed. So, with the book in your hand, you move the nozzle exactly over the pressure, lower it very slowly, and try to feel with a piece of paper placed in between when the nozzle touches the pressure.
The printer then knows exactly where this nozzle is located, if it is still referenced. Based on this height, the code is then split, the necessary initial steps are executed and then the printer prints again as if it had never stopped.
I Want This Too
After this semester I found the time to develop this project as a plugin for Octoprint. So you don’t need your own book and you can try it out in the web interface. But ATTENTION! This plugin is highly experimental and has also once caused damage to a 3D printer. I do not make any guarantees or take any responsibility for future damages and advise to always hover with your hand over the emergency switch until the first layer prints again and you are sure that the printer is working on the correct line.
Yours, Gerrit.


0 Comments