Soviet hand drill repair

Pre Story

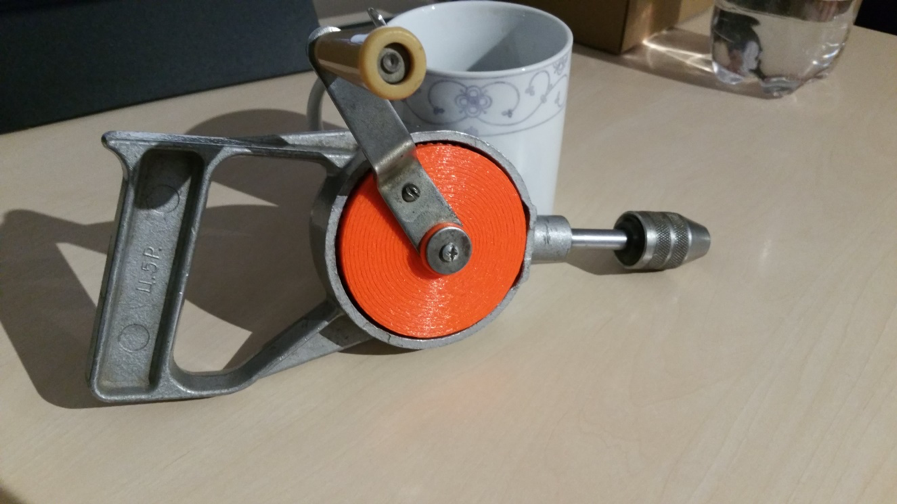
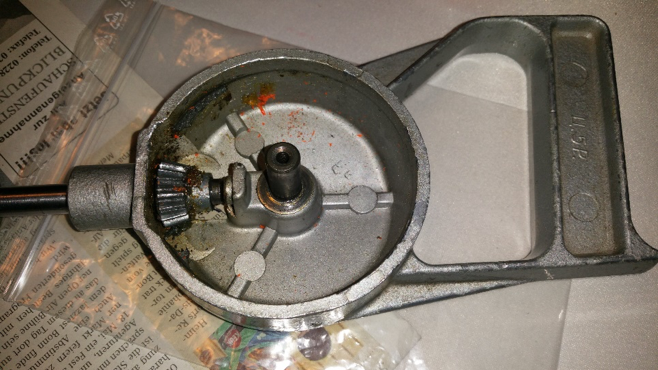
My father bought the thing at the flea market sometime. The price of 5 rubles (Ц. 5Р.) is incorporated in the handle, because at that time in the Soviet Union there was the planned economy and you could get a pack of butter for the same price in the big whole country.

Problem

The drill always did its job. It is particularly suitable for small jobs and you can dose the torque manually. Only at some point the drill got stuck somewhere and my father exerted too much momentum on the big bevel gear until a few plastic teeth sheared off, rendering the thing useless. The old bevel gear consisted of two parts: The front side with the teeth was made of a plastic casting and the back side was made of some kind of metal, which was somehow connected to the plastic (unfortunately no photo). So a new bevel gear was needed.

Solution

First, the teeth of the bevel gear had to be counted. There are 60 teeth. The driven bevel gear has 15 teeth, so there is a ratio of 1:4. In addition, all dimensions, such as the height of the teeth, their width and the bore diameter of the bevel gear had to be measured with a caliper gauge. The problem: the teeth are not simply arranged in a straight line, and their “focal point” is somewhere in the air. They are also wider at the outermost diameter than at the inner diameter of the bevel gear. So the geometry is a real challenge and you can’t just build the thing with a CAD program if you’re not a professional.
But what to do? Fortunately, I happened to come across a solidworks tutorial on the internet. It shows how to create configurable standard parts using the solidworks (SW) design library. And that worked well!

Procedure

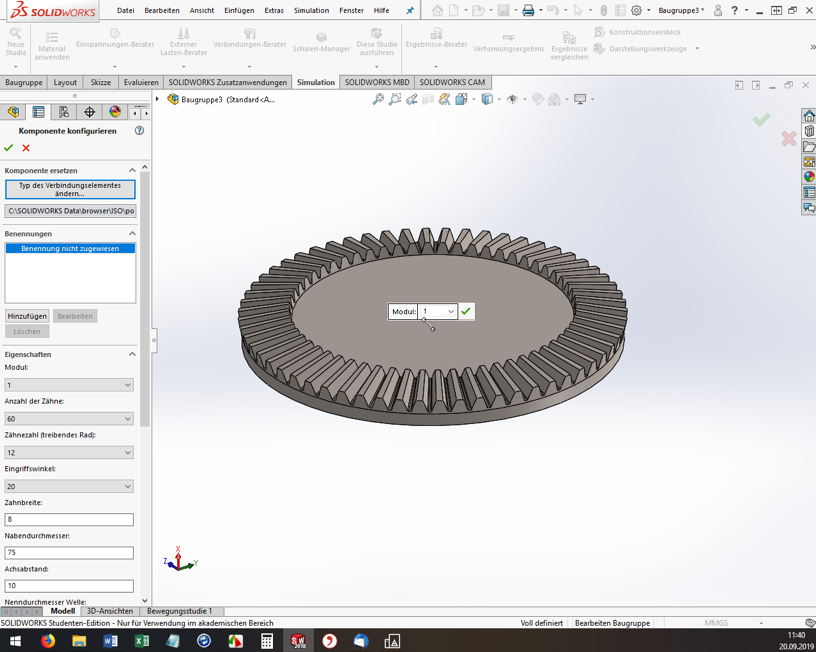
Open Solidworks, open any assembly and throw out all the parts. Somehow it didn’t work out any other way for me. Then, on the right side of the screen, open the construction library and shimmy through the tree. Toolbox, ISO, power transmission, gears, degree bevel gear (driving).

Solidworks

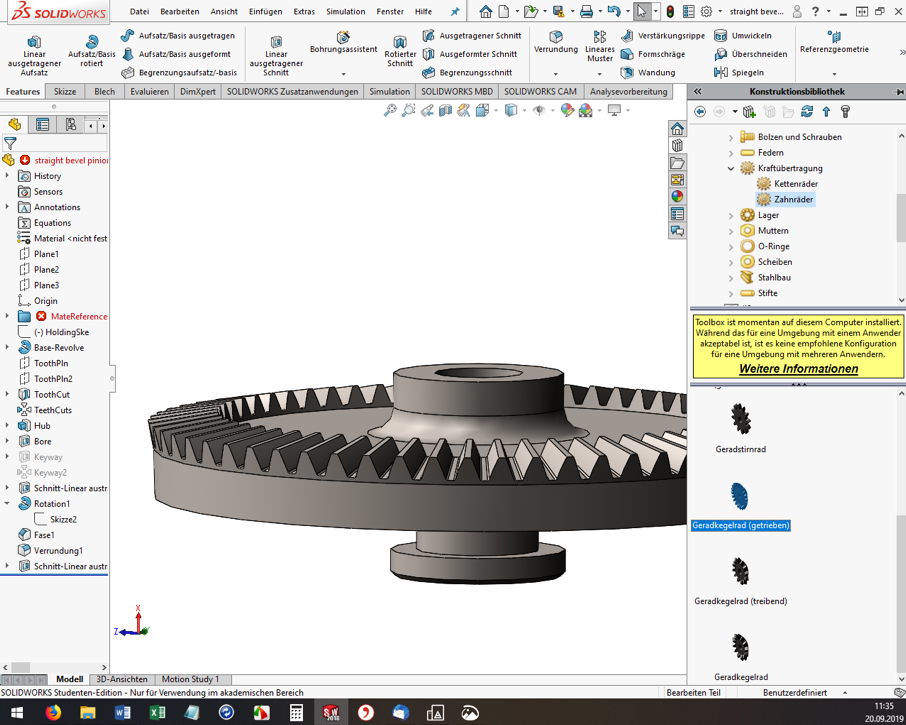
For me, the ISO standard matched well with my Soviet part. Then the “Degree bevel gear (driving)” must be dragged and dropped into the assembly window. Now the “Configure component” dialog opens on the left. The module, the number of teeth, the pressure angle, etc. can be set. Here you have to experiment, have the bevel gear with the green check mark built again and again and measure it. (Tip: If you click on a component edge, the bottom info bar of SW conveniently shows the measured length directly).

SolidWorks-2

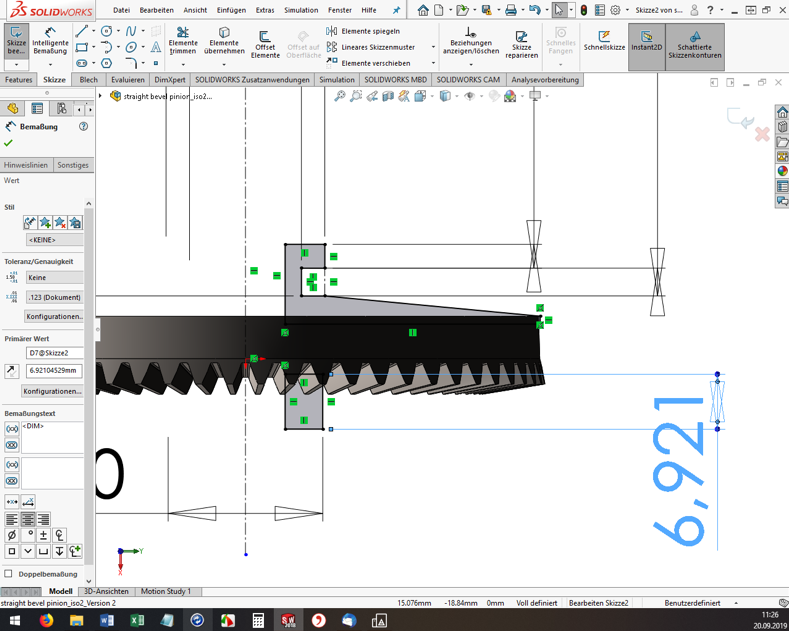
However, you cannot specify all dimensions and geometry properties in the configurator. And here’s where it gets a little tricky. If the tooth geometry of the blank created fits so far, the rest must now be added manually. I used the function “Attachment/Base rotated” to build a created sketch as a body of rotation to the blank (see screenshot). Again, I had to measure the old bevel gear over and over again.

SolidWorks-3

Once you are satisfied with the part, you need to export it to *.STL format for 3D printing. And off we go to the Fab Lab Siegen! Here Fabian helped me out, showed me the 3D printers and started the printing. Thanks a lot! 😊

Result

The first print was unsuccessful (of course). In 3D printing, for example, the holes are always slightly smaller compared to the model. The teeth were also too small, so that they could not engage deeply enough with the opposing teeth. These teeth also sheared off during initial attempts. In addition, the bracket for the crank was a bit too thin and is therefore broken off.

Gears printed

Drill machine open

But now it was possible to measure the printed bevel gear and improve the dimensions in SW and finally start a second attempt. However, the second time it went better than expected and the bevel gear installed beautifully. The hand drill runs very smoothly and if any problems should occur in a few years, I’ll just print out the bevel gear again 😉 .

Drill-machine-composed-1

Drill-machine-composed-2

A Child’s Book, or: Saving Plastic, Starting 3D Prints New

During the summer semester 2020, there was a printer in the Fab Lab that was constantly cancelled for testing. The printer with the name “Hades” had to serve as a test object for a children’s book. But what does a children’s book have to do with highly experimental, plastic-saving techniques? Let’s lunge a litte bit.

Earlier this summer semester, I decided to develop a children’s book for 3D printers. Together with my fellow student C. Ajiboye, this became a manual that tells a story on one side, one of Ursa, a girl exploring 3D printing through “Learning By Doing.” On the other side, there were explanations of how Ursa finds problems and what solutions it gives for each of them.
But the last page was special:

A WLAN-enabled (ESP32) microcontroller was embedded in this page. This one could feel touches via its touchpins. I then soldered these pins to copper surfaces and hid them under the page. One laser cut later, the copper surfaces could be seen shining through.

Thanks to these surfaces it was now possible to give commands to the ESP32. And thanks to the Octoprint servers, it was then possible to give commands to the printers. Yes, you read that right, this little book has a remote control for a 3D printer built in.

But What is the Point of All This?

Restarting a 3D print is not an easy task, so far there is not a single Octoprint plugin that dares to do this. The result is that when a print fails, which the sensors do not notice, a lot of time, sometimes days, and also up to kilos of plastic are lost. This book was intended to prevent that.

A book has many advantages: it’s quickly at hand, it’s often where you want it, and the software doesn’t change much. It is also lighter than a laptop and thus handier to use. What’s more, you don’t have to boot it up or preconfigure it. The interface is simply there.

But How do You Restart a Print With a Book Now?

A 3D print is stored in machine code. This “code” is written line by line and executed line by line afterwards. So a group of lines represents a layer, because a 3D print is done layer by layer. If a 3D print fails at one point, the commands could be executed again from this point. In the file, as well as in the real print, an exact height is defined for this. You could measure this height, but neither with the eye nor with a ruler you can find it exactly. With the 3D printer itself, on the other hand, you can find the exact height. Like calibrating old 3D prints, you can now use a piece of paper and the tip to determine to within 0.1mm where a print failed. So, with the book in your hand, you move the nozzle exactly over the pressure, lower it very slowly, and try to feel with a piece of paper placed in between when the nozzle touches the pressure.

The printer then knows exactly where this nozzle is located, if it is still referenced. Based on this height, the code is then split, the necessary initial steps are executed and then the printer prints again as if it had never stopped.

I Want This Too

After this semester I found the time to develop this project as a plugin for Octoprint. So you don’t need your own book and you can try it out in the web interface. But ATTENTION! This plugin is highly experimental and has also once caused damage to a 3D printer. I do not make any guarantees or take any responsibility for future damages and advise to always hover with your hand over the emergency switch until the first layer prints again and you are sure that the printer is working on the correct line.

Yours, Gerrit.

Welcome Freshmen!

Dear freshmen, we are glad you found your way to the University of Siegen. With us you can create crazy things! The following text was published with little changes in the ESE-paper of the GG LaBaMa in the winter terms 20/21..

Here could be a formal text describing what a Fab Lab is, what technologies you can find in our Fab Lab, what the Fab Lab has to do with a university and why actually “Fab Lab? But I think you are all able to type fablab-siegen.de into your browser and find out for yourself what we have to offer as Fab Lab of the University of Siegen. That’s why I’m saving you this. Just so much: The Fab Lab is an open creative lab of the university with many different machines like 3D printers, laser cutters, CNC mills and so on. When there is not global pandemic anyone can come and do cool things.

A Brief Introduction of the Fab Lab.

The idea for this text came to me in the shower. I was wondering what of our pre-written text about the Lab I might send to the editors of the ESE newspaper to let first-year students know that the Fab Lab exists. And then I remembered a mail from “nanooq”, who announced that he will write a text for the Hasi for this newspaper. What the Hasi is is (presumably) in his text, which is also printed in this publication. Who nanooq is, you may never know. Or he suddenly appears in your life because you have set foot in the Siegen “scene”. Then: all the best! Well and because I already know nanooq a bit and also his texts and stories about the scene, a formal text about the interior design and the scientific orientation of the Fab Lab seemed a bit stale to me. The glittering hasi (yes the article is chosen correctly!) and nanooq’s wordiness will make the Fab Lab look old. So I’ll give it a try.

Often during your studies you will surely hear the question: “But why Siegen?”.
And you might get into trouble explaining: “Because it’s so beautifully green here!”, or “Because I can attend seminars about Harry Potter here…!”.
In my case, the Fab Lab (and a failed course of study) was more of a deciding factor. Because in a Fab Lab like this, you can expect not only certain machines, but also a certain kind of people. Cosmopolitan, colorful, creative, crazy intergalactic creatures.

One of the reasons why I decided to study in Siegen was that when I was visiting the university (yes, there are such nerds), I was led by the tutor of the HCI students at the time (HCI stands for Human Computer Interaction. What Human Computer Interaction stands for….well duckduckgo it yourself) was also led into a small lab, in which my current work colleague Marios sat engrossed bent over a microcontroller circuit. I was introduced to the space as the “Fab Lab”.
“You could do something like Marios is doing right now in your studies”, my tutor tried to get me. Since then, I’ve spent a lot of time in the Fab Lab, even outside of my studies, and experienced a lot. In the meantime, I even work there.

One of the trades we built in the Lab (the connoisseur only speaks of “Lab” [ˈlæb], the “Fab” is silent!) even made it into the daily news. A palm tree, made of bed slats and dryer exhaust hoses, sidewalk slabs, steel and quite a lot of light and electronics.

At one point, there were large quantities of bed slats in the Lab’s warehouse for this project. People from Siegen have a lot of slatted frames to give away for free, we took advantage of that (Attention: Insider tip). And these bed slats wanted to be sanded so that they could then be repainted with white paint. White paint reflects very well, so it’s good to shine spotlights on it. Later, the battens should be screwed into triangles. Several of these triangles of slightly bent bed slats screwed together form the skeleton of a palm leaf. It’s like that. If you then hang these leaves in a star shape on a metal trunk you get a span of 9 meters. In height, the palm tree brings it to four and a half meters.

After painstakingly disassembling the slats in the Hasi, we sanded down the extracted bed slats at the back entrance of the Lab using the most inefficient tools (orbital sander and sandpaper) we could find. Maybe the tool could have been used to sand down normal wood, but not the nasty coating those bed slat manufacturers had put on there.

People grind wooden slats

One grinds behind the laboratory.

So we’re standing at the back entrance of the Lab in the parking lot, struggling with these bed slats. A car parks next to us. A guy we don’t know gets out. Maybe 40, slight grin on his lips. As he walks from his car to our rather sad collection of mediocre “craftsmen”, he smugly calls in our direction, “Well, do you need help?!”.
We defiantly try to ignore him in frustration. All I hear nanooq saying is “No thanks, we’ll be fine”.
“I might have what you need in the trunk,” the stranger replies.
So there’s a complete stranger who happens to have what we need in the trunk. Hm, sure.
nanooq, still a bit curious, follows him and the two come back with several cutters and grinding wheels. The sanding discs we brought with us were perfect: sandpaper arranged in a circle, stacked like flaps.

It slowly dawned on me what was going on. Past me, thank you! I had asked 1-2 hours before on the off chance in the Fab Lab Telegram group if someone had suitable tools for our action. I had not expected that strangers read along and also still feel addressed. And then just load up the trunk with tools and hit our place. It’s going well. For the remaining battens, we then needed another minute per batten. It took 10 minutes. This results in a working time reduction of 90%. Henry Ford would somersault in his grave.

The finished palm tree. The painstaking work was worth it. Creative design: Simon Budig. A project by people from Hackspace Siegen and the Lab.

The man with the cutters has been in and out of the Lab regularly (if it weren’t for this damned virus) ever since. He is now “part of the community.” And that’s what the Lab is all about. The Community. People meet, exchange ideas, pass on their knowledge, teach each other new things.

Check out our Telegram group or our news channel (also Telegram). At the moment we have a limited operation until further notice, always on Wednesdays and only for university members (as well as students). Soon we will hopefully be able to open again for everyone, so you can experience live and up close what makes the magic of a Fab Lab. We’ll put that in the Telegram group, on our website, Twitter, Facebook. You know it. Until further notice our

opening hour (with regard to news about corona) apply.